tenBrultechServer Configuration
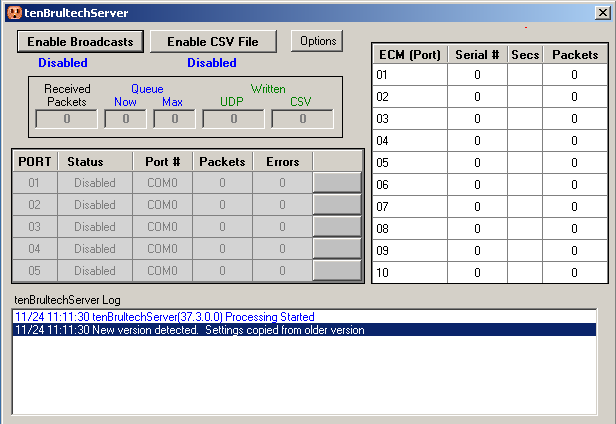
When tenBrultechServer is started, it displays the main dialog as shown below:
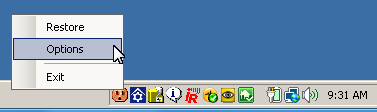
First, open the Options dialog: Click the Options button on the main
screen or right-click the tenBrultechserver icon in the
windows notification area and click on Options as per below:
The following Options dialog will be displayed:
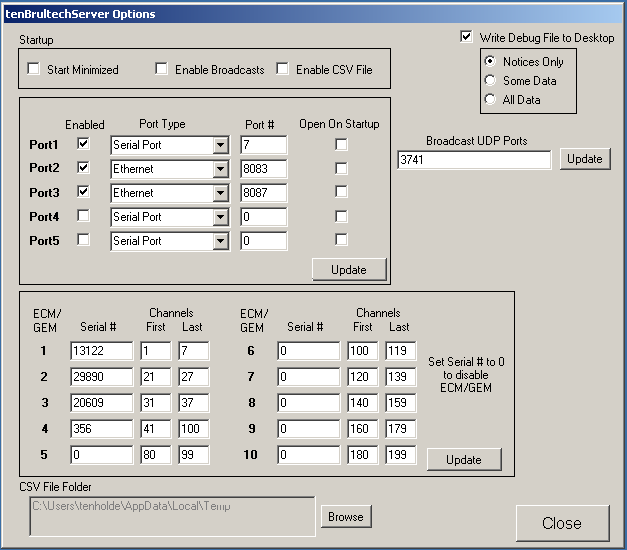
tenBrultehServer can receive pakets from up to ten ECM/GEMs simultaneously
using five different COM or TCP ports. First, configure the COM and TCP
ports that will be used to receive packets from your ECM/GEMs. Set the
port type (serial or ethernet), and set the
port number used for communications with the ECM/GEMs. More than one ECM
and or GEM can communicate via a single port. If specifying a serial port,
enter the COM port number that the ECM/GEM(s)
are attached to. If connecting via ethernet through the EtherBee or
EtherPort, enter
the TCP port configured for the EtherBee/EtherPort (usually, 8083). You should have
already run the
EtherBee configuration program that set the TCP port. You also
should have configured the EtherBee with the IP address of the tenBrultechServer
computer. If connecting a GEM via direct ethernet or wifi, specify the TCP port
configured using the
EtherX configurator for the GEM (usually 8087) and the IP address of the
tenBrultechServer computer. Remember to click the
Update button to save your changes.
Now that you have configured the connection methods (serial ports and/or ethernet
ports) you must configure each of ten ECM/GEMs. First enter the serial number
for each ECM/GEM in your system (enter a zero to disable any ECM/GEM entries not
used). If you are not sure of the serial number of a specific ECM/GEM,
enter any unique non-zero number and the log dialog on the main panel will list
the serial numbers of any packets that were received from undefined ECM/GEMs,
allowing you to update your configuration with the correct serial numbers (note:
you must open the port that the ECM/GEM is connected to in order for it to
receive the packets and identify any incorrect serial numbers).
For each ECM/GEM, you must assign theVirtual Channels you want the data from this
ECM/GEM to be assigned. With the capability of connecting up to ten
ECM/GEMS, there are now many channels of data available (approximately 440),
even if you do not connect any house circuits to each of these channels.
For instance, you might have three electical panels in your home, each with a
GEM located at that panel, and 15 circuits connected to each GEM. In order to
limit the size of packets sent across your network, you define only the range of
channels for each ECM/GEM that you use. Instead of broacasting data for
440 channels, we only need to broadcast data for 45 channels.
tenBrultechServer supports the processing of up to 199 channels in the
initial release. For each ECM/GEM, you specify the First Virtual Channel
number to assign to the first physical ECM/GEM channel and the Last Virtual
Channel to assign from the ECM/GEM. This identifies how many channels from
the ECM/GEM will be used (always the lowest physical channels), and which
Virtual Channels to assign to them. IT IS IMPORTANT TO THINK THROUGH THIS
CHANNEL ASSIGNMENT CAREFULLY. All clients will receive only the Virtual
Channel numbers you define. If you change the assignments in
tenBrultechServer, you will most likely have to adjust your clients
accordingly (potentially a significant problem if you are
saving historic data to a database).
You should, therefore, only attach circuits to the lowest channel numbers
(specially for GEMs), only define Virtual Channels for physical channels
actually used, and leave Virtual Channels undefined between the ranges used for
each ECM/GEM (for instance, if you have GEM1 defined to use Virtual Channels
65-82, start GEM2 at say 95 to leave Virtual Channels avialable in case you add
additional circuits to GEM1). Remember to click the Update
button to save your changes.
For the GEM, the first 48 physical channels are energy monitoring channels
(current model only uses the first 32, but the GEM transmits 48 anticipating an
add-on module that will add an additional 16 channels to the GEM). Channels
49-52 are Pulse Counters, and Channels 53-60 are Temp Sensors. If you are
using the Pulse Counters and/or Temp Sensors, make sure you define the
First Channel and Last Channel to include these
Channels.
Then enter the UDP Ports (separated by a comma) to be used to broadcast data to
client programs and click the
Update button. In
most cases, only a single UDP port is necessary. Multiple computers can
all receive on this same port simultaneously. In most cases, multiple
programs on the same computer can also receive on the same port simultaneously.
If you find that you are having difficulty running multiple clients on the same
computer using the same port, you can have tenBrultechServer broadcast on up
to 3 ports and have each client program listen on a different port.
Although tenBrultechServer broadcasts Comma-Separated-Values (CSV) formatted
UDP packets and there is a tenEcmCsvLogger program
that receives these packets and writes them to a flat file, you can also have
tenBrultechServer write the CSV records directly to a flat file. You can
change the default folder (but not the file name) in which the records are
written by browsing to the target folder and clicking OK. The file name is
always tenEcmCsvLogger.csv.
You should also check the Write Debug File to Desktop box and select at
least Notices Only.
When you first start tenBrultechServer, you must manually enable ECM/GEM
communications (by clicking one or more Open buttons) and
packet Broadcasts (by clicking the Enable Broadcasts button).
In the
Options dialog, you can specify that you want to automatically open each of the ports,
start broadcasting UDP records, start writing CSV records to a file, and minimize
tenBrultechServer to the notification area as soon as tenBrultechServer is
started. You can then place a shortcut to tenBrultechServer in the
windows Start/Programs/Startup folder and automatically run
tenBrultechServer unattended.
Once you've configured tenBrultechServer for proper communications,
you first click one or more Open buttons to start talking to the ECM/GEM(s). Then click the
Enable Broadcasts button to start broadcasting UDP packets to all client
programs. You can also click the Enable CSV File button to begin writing
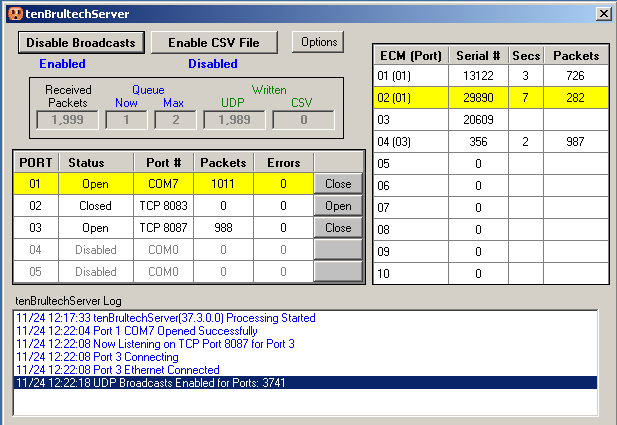
CSV records to a flat file. The image below depicts the dialog while
receiving ECM/GEM data from a serial port (Port 01) with two ECMs attached and
an ethernet port Port 03) with a single GEM, and broadcasting UDP packets to clients:
You can minimize the window to the Notification Area by clicking the X at
the top-right of the window. Right-click the icon in the Notification Area
to either restore the window to normal size, display the Options dialog, or to close tenEcmServer.